-
How to download Udemy Videos? – Stack Overflow
” git clone https://github.com/r0oth3x49/udemy-dl.git
pip install -r requirements.txt
4) Download as you would normally do (from virtual box):python udemy-dl.py -u user@domain.com -p p4ssw0rd COURSE_URL”
-
windows – Clock time is off on dual boot – Ask Ubuntu
“Make Linux use ‘Local’ time
To tell your Ubuntu system that the hardware clock is set to ‘local’ time:
Pre-Ubuntu 15.04 systems (e.g. Ubuntu 14.04 LTS):
edit /etc/default/rcS
add or change the following section
# Set UTC=yes if your hardware clock is set to UTC (GMT)
UTC=noUbuntu 15.04 systems and above (e.g. Ubuntu 16.04 LTS):
open a terminal and execute the following command
timedatectl set-local-rtc 1
”
Autor: nothepad
Update (weekly)
-
Change default code page of Windows console to UTF-8 – Super User
“To change the codepage for the console only, do the following:
Start -> Run -> regedit
Go to [HKEY_LOCAL_MACHINE\Software\Microsoft\Command Processor\Autorun]
Change the value to chcp 65001″ -
java – Hibernate @ManyToOne “Target Entity is not defined” – Stack Overflow
“This error has nothing to do with your application. It works fine but the error is in Eclipse.
To remove this (and other JPA) error message simply disable the JPA validation under Window -> Preferences -> Validation and here remove the checks from JPA Validator.
Generally most applications can be developed without any validators because bigger projects’ validation slows down compiling in eclipse way too much. In this case click Disable all in the same window below the table of validators.”
-
“You are attempting to update the UI from a background thread. Either move the toast to onPostExecute, which executes on the UI thread (recommended), or call runOnUiThread.”
-
Developing Android Apps – Udacity
“padding and layout_margin are two very similar attributes. Both determine the space around a View. The difference is that padding determines space within the boundaries of the view, and layout_margin determines the space outside the boundaries of the view”
Update (weekly)
-
Chapter 1. Running and Using HyperSQL
” java -cp ../lib/hsqldb.jar org.hsqldb.util.DatabaseManagerSwing”
-
-
usar com argumento -url jdbc:hsqldb:file:/opt/db/testdb após o argumento de java -cp
-
-
jdbc:hsqldb:file:/opt/db/testdb
-
-
“@RequestMapping(value = PATH)
ErrorJson error(HttpServletRequest request, HttpServletResponse response) {
// Appropriate HTTP response code (e.g. 404 or 500) is automatically set by Spring.
// Here we just define response body.
return new ErrorJson(response.getStatus(), getErrorAttributes(request, debug));
}” -
CLI Batch Mode |JBoss Developer
“The batch mode allows one to group commands and operations and execute them together as an atomic unit, i.e., if at least one of the commands or operations fails, all the other successfully executed commands and operations in the batch are rolled back.
Not all of the commands can be added to a batch. E.g. commands like ‘cd’, ‘ls’, ‘help’, etc are not added to the batch since they don’t translate into operation requests. These commands (if entered while in the batch mode) will be executed outside of the batch. Only the commands that translate into operation requests are allowed in the batch. The batch, actually, translates into a ‘composite’ operation request.”
Update (weekly)
-
startup – Cannot run Eclipse; JVM terminated. Exit code=13 – Stack Overflow
“I had the same error when configuring eclipse.ini to use JRE6. Turns out I caused this error by incorrectly configuring eclipse to use the 64 bit JVM while running a 32 bit version of eclipse 3.7.
The correct configuration required the eclipse.ini -vm argumument to use “C:/Program Files (x86)/” instead of “C:/Program Files/”.
Make sure that the JVM version (32/64 bit) you use matches the eclipse version (32/64 bit).”
-
Red Hat JBoss Enterprise Application Platform (EAP) Quickstarts | Red Hat Developers
“If you are a beginner or new to JBoss, start with the quickstarts labeled Beginner, then try those marked as Intermediate. When you are comfortable with those, move on to the Advanced quickstarts”
-
Reduce eclipse tab size with GTK theming – Unix & Linux Stack Exchange
“The default GNOME3 themes are a disaster for tiny screens. However, the Gnome3 crowd seems to be pretty unwilling to listen to their users. They only think of how stuff looks, in particular on a tablet PC or mobile device, it seems. Soon, Gnome3 will require a 4k screen.
Anyway, the best solution I have found is to switch the theme to the XFCE themes. On Ubuntu and Debian you should be able to install them via apt install gtk3-engines-xfce gtk2-engines-xfce. Then you can use the gnome-tweak-tool to change the theme. I’m currently using XFCE-orange theme, and it has much less padding than the default Gnome3 desaster “Adwaita”. Plus, it doesn’t use that depressing black for half of the applications! I think the tooltips in Eclipse were also broken with Adwaita.
I’m slowly switching from Gnome3 to XFCE on my computers, one after another. Because Gnome3 keeps on getting less and less useful for me, as I’m not your average “joe clueless” user that the Gnome3 people consider to be their only audience. I’m fed up with them breaking things for me. Now they’ve just announced to discontinue the panel which I’m using instead of the broken by design gnome-shell.
For eclipse specifically, I suggest to
export SWT_GTK3=0
in your ~/.profile. GTK3 with Eclipse is just a crazy waste of screen space.”
Update (weekly)
-
compiling – How to use ‘apt’ to get source code and then do separate compile – Ask Ubuntu
”
down vote
acceptedFor this example I’ll use icedtea-6-jre-jamvm as the package you want to rebuild.
First install all the dependencies and build essential:
sudo apt-get build-dep icedtea-6-jre-jamvm
sudo apt-get install build-essentialThen grab the source:
apt-get source icedtea-6-jre-jamvm
Then cd in the openjdk directory directory and build the deb, the -us and -uc here skip the GPG checks if you’re just rebuilding it for yourself:
cd openjdk-6-6b24-1.11.5
dpkg-buildpackage -us -ucThen go up a directory and you should have .deb files. ”
-
How to Fix macOS Sierra Screen Resolution on VirtualBox? – wikigain
“
Replace VM Name to macOS Sierra(VM name in VB)
Step #4. Choose the resolution of your screen monitor from the list below, to choose one just clean N and type the number of that resolution size.
Choose your Screen Resolution From the List
Step #5. Press Windows button + X and click on Command Prompt (Admin).
Run CMD as Admin
Step #6. Select the VirtualBox path by the change directory command, so copy & paste the command to Command Prompt(CMD) then hit enter.
Choose VirtualBox Path
Step #7. These time Copy & paste the fix screen resolution code to Command Prompt(CMD) then hit enter.
Note: Be sure that you have selected a fix resolution for your monitor screen and choice the amount of N. after copying the code to virtual-box then close all tabs.
Run the Screen Resolution Code
Step #8. Start the installed macOS Sierra virtual machine from VirtualBox.
Launch the macOS Sierra VM
Step #9. Now log in to your account and check the screen resolution to confirm it has worked or not. So was all”
-
Step #4. Choose the resolution of your screen monitor from the list below, to choose one just clean N and type the number of that resolution size.
-
VBoxManage setextradata “MacOsSierra” “VBoxInternal2/EfiGopMode” 4
-
-
These time Copy & paste the fix screen resolution code to Command Prompt(CMD) then hit enter.
-
Update (weekly)
-
Como Instalar o Mac OS X em VirtualBox no Linux – BR-Linux.org
-
Gato de óculos escuros ‘invade’ reportagem do RJTV
“Um gato usando óculos escuros ‘invadiu’ uma reportagem do RJTV no sábado, 27, e ganhou a internet como o mais novo meme. Enquanto o repórter Pedro Figueiredo falava sobre tiroteios e mais uma pessoa ferida na favela da Rocinha, no Rio de Janeiro, o animal surge “bem pleno” em uma moto, acompanhado do motorista.
Reprodutor de vídeo de: YouTube (Política de Privacidade)
No Twitter, o vídeo viralizou. Alguns internautas comentam a possibilidade de o animal ser o gato Chiquinho, famoso na comunidade da Rocinha por gostar de relaxar e ter pose de motoqueiro tal como seu dono Alexandre.Assista ao momento abaixo, a partir dos 00:56:”
-
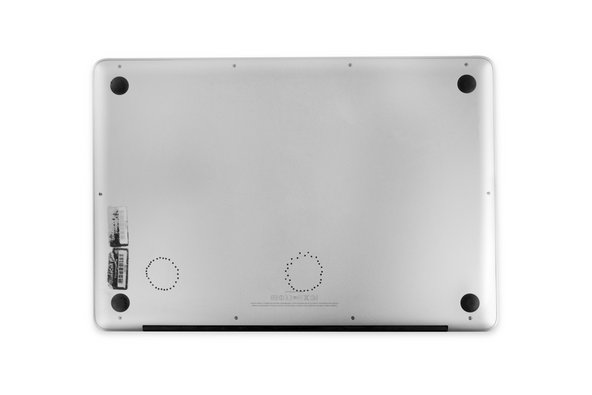
Why I Drilled Holes in My MacBook Pro and Put It in the Oven | iFixit
Lembrando que o Titanic foi feito por profissionais e a Arca de Noé por um amador…
-
we decided it was time to break out the bigger guns. That is, we pulled out a drill. With a 1/16” bit, we drilled holes in the bottom case, under the fans (we figured out where the blades of the fan were exposed based on the dust pattern stuck to the inside of the bottom case). The speed holes worked: The boot chime rang. The screen glowed. The fans blew.
These are speed holes. They make the computer go faster.
There’s noticeably increased airflow—when I put a piece of paper on the bottom of the computer, it sticks to the case. Its average temperature is down in the 40s and 50s, lower than it’s been since before March.
It’s a little early for a final verdict, but the computer has now been running without incident for fifteen days. Unconventional electronics repair tools they may be, but that’s how I saved my MacBook Pro with a drill and an oven.
-
Sempre pode melhorar
Estou postando um novo artigo para ver se funciona o novo esquema de url: ano/mes/título. No primeiro post deu erro de link, vejamos se este post abre clicando no seu link!
Gnucash versus JUMSOFT Money
Desde antes de 2005, utilizo o Gnucash para controle de gastos (e investimentos). Desde dezembro de 2010, tenho utilizado o JUMSOFT Money no Macbook Pro de 13 polegadas.
Porém apesar de certo tempo de utilização em março de 2011, ainda não utilizo o Money para acompanhar investimentos (fundos, não poupança), e portanto esta parte ainda não está coberta. Assim que for testado, adicionarei informações comparativas nesta área também.
Na comparação abaixo, colocarei em negrito as vantagens de cada software e em itálico vermelho as desvantagens.
Sistemas suportados: sem vencedor
- Gnucash: Windows, Linux, Mac OS
- Money: Mac OS, iOS
Entrada de dados: vitória do Gnucash
- Gnucash: pode mover o cursor com o teclado, adicionar entradas simplesmente digitando os valores (os campos se auto-completam e na digitação do campo Payee no caso a conta debitada, ao se digitar “:” completa-se e abre as sub-contas respectivas). Também dá pra configurar pra tratar as entradas como centavos, sem necessitar adicionar vírgula/ponto mas tendo de adicionar dois zeros nos valores inteiros. Porém o Gnucash tem um bug de usabilidade no Mac OS: às vezes, ao focalizar o aplicativo via alt-tab, deve-se dar inúmeros tabs até focalizar o registro de entrada.
- Money: para adicionar um ítem ou editar não é tão simples assim, deve-se acionar os atalhos command-N e command-I respectivamente. E pra entrar com transferências/depósitos (por default entra-se despesas, ou withdrawals) é preciso selecionar com o mouse (pois não dá pra selecionar o campo com a tecla tab), impossibilitando a entrada exclusivamente pelo teclado.
Entradas programadas/recorrentes: sem vencedor
- Gnucash: Existe um editor de contas programadas podendo escolher com quantos dias de antecedência a entrada é criada, mas para editar é preciso abrir com o mouse uma aba separada e confirmar a modificação.
- Money: as entradas somente são criadas na data porém dá pra modificá-las na aba Bills tão acessível quanto as outras contas como uma entrada normal (com o atalho command-I)
Sincronização com gadgets: vitória do Money
- Gnucash: sem sincronia com gadgets
- Money: sincroniza com dispositivo iOS, detectando automaticamente quando a app grátis Money é aberta no dispositivo conectado na mesma rede do Mac OS (via wifi ou Internet tethering)
Importação de dados: sem vencedor
- Gnucash: importa CSV, QIF, OFX e outros formatos exóticos
- Money: importa QIF, CSV e OFX
Exportação de dados: vitória do Money
- Gnucash: exporta somente nos formatos nativos (XML e SQLite 3). Observação: versão atual, 2.4. Na versão 2.2 e anteriores não tinha SQLite 3.
- Money: exporta nos formatos portáveis QIF e CSV
Relatórios: vitória do Gnucash
- Gnucash: Tem relatórios pré-definidos bastante úteis, como o gráfico de receitas/despesas, portfólio de investimentos (todas as contas que não usam uma moeda padrão, mas índice de fundos), entre outras, com intervalo de datas configurável.
- Money: tem uns relatórios pré-definidos, mas que porém não funcionaram (o relatório Spending By Category mostrou todos os valores zerados)
Investimentos: vitória do Gnucash
- Gnucash: Pode ser criar novas “moedas” que refletem a cotação de fundos com até 8 casas decimais (Tools->Secutiry editor: Fraction traded: 1/100000000) e criar contas de investimento baseadas nestas moedas.
- Money: Ao criar uma conta de investimento só aparecem moedas para escolher, sem possibilidade de criar índices de fundos.
Acesso a dados: vitória do Money
- Gnucash: Tem um formulário de busca que abre uma nova janela de resultados (pessoalmente nunca utilizei). Opcionalmente os dados podem ser ordenados por um menu de contexto que abre uma janela de seleção
- Money: Tem uma barra de busca que filtra resultados da conta atual ou de todas as contas (caso a aba Transaction Center esteja selecionada) e com um simples esc volta a mostrar todos os dados. Além disso, os dados podem ser ordenados simplesmente clicando no campo desejado
Conclusão: Gnucash 3 x Money 3
A grande deficiência do Gnucash é, evidentemente, sua incapacidade de exportar para formatos compatíveis, como QIF e CSV. Além disso, o Gnucash não tem um iPhone companion, para entrada de dados on-the-go. Portanto, nesta fase de testes, utilizo o JUMSOFT Money para entrar e reconciliar os dados, e depois repasso pro Gnucash, enquanto não acho uma alternativa melhor que suporte relatórios e investimentos (iBank talvez seja o próximo assunto desta série de artigos).
Unindo o melhor dos mundos com as locales pt_BR e en_US
No ubuntu as locales, variáveis que começam com LC_ e LANG/LANGUAGE, determinam em quais idiomas iremos interagir com o desktop.
Nós brasileiros podemos utilizar pt_BR para ter menus, mensagens, formatos: data, hora, monetário, separador de milhares no nosso formato nativo, ou então utilizar o padrão en_US. O problema ao se utilizar o pt_BR, é que quando nos deparamos com mensagens de erro e googlamos por elas, não conseguimos encontrar a solução. Portanto o ideal é: mensagens de erro (e também opções de menu, ajuda, etc.) em inglês e os formatos na localidade brasileira.
Para tanto, é preciso adicionar as seguintes linhas em /etc/environment e /etc/default/locale (na minha experiência deixando LANG em pt_BR continuou com mensagens em en_US):
LANG=pt_BR.utf8
LANGUAGE=en_US.UTF-8
LC_CTYPE=pt_BR.UTF-8
LC_NUMERIC=pt_BR.UTF-8
LC_TIME=pt_BR.UTF-8
LC_COLLATE=pt_BR.UTF-8
LC_MONETARY=pt_BR.UTF-8
LC_MESSAGES=en_US.UTF-8
LC_PAPER=en_US.UTF-8
LC_NAME=en_US.UTF-8
LC_ADDRESS=en_US.UTF-8
LC_TELEPHONE=en_US.UTF-8
LC_MEASUREMENT=pt_BR.UTF-8
LC_IDENTIFICATION=en_US.UTF-8
LC_ALL=
e seja feliz.
Drag’n’Drop, Hashes MD5 no Ubuntu!
Após muito pesquisar no Google, vi que estamos ainda, usuários do Ubuntu, relegados a abrir um terminal toda vez que queremos verificar a Hash MD5 de um arquivo (para comparar se dois são iguais, e também verificar autenticidade de arquivos baixados da internet). No Windows, beleza, tem o freeware Hash Tab que adiciona uma tab nas propriedades de arquivo para esta função. Mas para Ubuntu, em ambiente Gnome, ainda não passa de uma idéia (http://brainstorm.ubuntu.com/idea/2139/). Pois bem, em atenção ao princípio de que em software livre os usuários também devem colaborar se não a coisa não anda, resolvi publicar o script, que coloquei na área de trabalho como lançador (comando = “~/bin/gmd5sum %u” com argumento %u pois assim basta arrastar e soltar um arquivo para verificar sua checksum).
Como sabemos que os discos rígidos são a parte mais lenta de um computador, e para calcular uma hash MD5 de um arquivo com vários gigabytes pode levar muito tempo (pois ele tem que ler todo o arquivo) então coloquei um limite, de 4Gb = 4096 Megabytes, onde passando disso o script se recusa a executar. Isto pode ser configurado, alterando a linha, TOO_HIGH_SIZE=4096, para o valor desejado.
Dito isto, este é o script (basta copiar e colar num arquivo, torná-lo executável e criar um lançador pra ele na área de trabalho conforme explicado acima):
#!/bin/bash
#Configurar tamanhos altos e altos de mais (em Mb): alto, mostra mensagem informativa
#e alto demais, emite mensagem de erro sem calcular checksum
HIGH_SIZE=100
TOO_HIGH_SIZE=4096
FILE="${@}"
if [ "x$1" = "x" ]; then
	xmessage "Erro: nenhum arquivo indicado para calcular md5 sum"
	exit 1
fi;
SIZE=$(ls -l "${FILE}"|awk '{print $5}')
SIZE_HUMAN=$((SIZE/1024/1024))
if [ $SIZE_HUMAN -gt $TOO_HIGH_SIZE ]; then
	xmessage "Erro: '$FILE': tamanho de arquivo muito grande ($SIZE_HUMAN > $TOO_HIGH_SIZE Mb)"
	exit 1
fi;
if [ $SIZE_HUMAN -gt $HIGH_SIZE ]; then
	xmessage "Calculando checksum de arquivo com $SIZE_HUMAN Mb..." -nearmouse -timeout 5 -buttons Ok:0,Cancelar:1
	if [ $? -eq 1 ]; then
		xmessage -nearmouse -timeout 5 "Operacao cancelada pelo usuario..."
	        exit 1
	fi
fi

MD5="$(md5sum "${FILE}")"
xmessage "$MD5 ($SIZE bytes = $SIZE_HUMAN Mb)"